 |
| Affiliate Area Home | Getting Started & FAQ | 42 Part Affiliate Training Course and Videos |
|
|
The Best Chest Exercises
|


|
On this page, I've got 4 chest articles taken directly from the book that you can use to promote it. The content of the article itself should remain as-is but feel free to write up your own introduction and follow-up to the exercise information, e.g. your exerperiences with the exercises, how you liked them, etc. The author bio area should remain the as-is (with the exception of your affiliate link, of course!) - it's going to have a strong call to action to encourage people to go to the site and get MORE free sample exercises to try out. Here's the list of articles...just click on the title to get to the exercise. DEFINITELY grab the exercise pictures directly off the page as well. Just right-click and choose "save picture as" and post them on your page where they are located in the article. Feel free to add some formatting to the article (bold, italics, underlines, etc.) when you're posting these on a web page or change the title to suit your audience. |
|
NOTE: Where there links to videos (on YouTube), they will first go through an affiliate redirect link so you'll always get credit for your traffic! Just trade out the XXXXX's for your Clickbank ID. I will also include the embedding code for them, if you're putting the videos up a web page, though. |
| 1. | Got No Chest? How to Feel Your Pecs Actually WORK When You Do Chest Training | This article is all about forcing the pecs to actually WORK when training the chest. It's an excellent intro to some unique training techniques and exercises. |
| 2. | How To Do The Perfect Bench Press Rep | This is all about the bench press..how to properly set up, how to place your hands, where to set your legs, how to push...the whole deal. |
| 3. | Power Rack Weighted Push-Ups - An Easy Way To Get MORE Out Of the Push-Up | This exercise shows people how to add resistance to the push-up exercise quickly and easily by using a hip belt and the power rack. It's extremely effective and requires very little equipment. |
| 4. | Lying Side Dumbell Flyes For Maximum Chest Contraction and Sharp Chest Cleavage | This is a free weight exercise that targets the inner chest with a strong contraction...easy to set up and do and extremely effective for hitting that area. |
|
Got No Chest? How to Feel Your Pecs Actually WORK When You Do Chest Training By Nick Nilsson Note: This article is an excerpt from Nick's new book "The Best Chest Exercises You've Never Heard Of"...53 unique exercises and training techniques for the chest. If you're looking to break through a plateau, get some training variety or just have some fun in your training again definitely check this book out! http://hop.clickbank.net/?XXXXX/betteru&l=850 --- One of the most common training questions I get with regards to chest training is simply not being able to feel the pecs working at all when doing chest exercises! And when you can't feel the pecs working, you know darn well that actual muscle development is simply NOT going to happen. So enough about the problem...how do you FIX it? I've got a number of techniques for you to try out, some of which may work better than others for you. But they should get you well on your way towards the chest development you're looking for.
When performing a movement like the bench press, the pecs are definitely involved but can be easily pushed into a secondary role by the front delts and the triceps. So instead of doing a regular bench press movement, you will instead do 6 to 8 reps of dumbell flyes (an isolation movement for the chest) THEN immediately go right to the bench press. The idea here is to "pre-exhaust" your pecs so that when you do the bench press, your pecs are the weakest link and the shoulders and triceps then push the chest harder than it would normally be pushed. When you have to stop, it's going to be pec fatigue that ends the set while the shoulders and triceps are still relatively fresh.
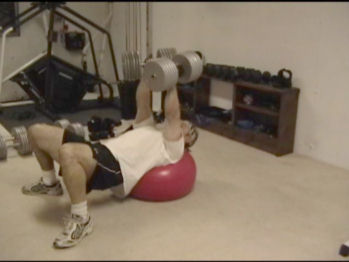
Now, the pre-exhaust training is all well and good...but what if you can't feel your pecs even doing FLYES? Pre-exhaust won't be much help. The first thing you need to do is get off the flat bench and onto a Swiss Ball. Get into position on the ball and wrap your entire back AROUND the ball. Don't just put your shoulders on the ball and keep your body straight, like many people are taught with the ball.
To get the most out of flyes, you need to open up your rib cage and get your shoulders back (which helps focus the tension on the pecs instead of the shoulders). The ball is PERFECT for this position. So lay back on the ball, wrap your back around it and consciously force your shoulders back and down. THEN do a dumbell flye.
Imagine on the way down like you're trying to push your chest up to the ceiling. And imagine on the way up that you're wrapping your arms around a big tree. When doing flyes, don't hold the dumbells perfectly parallel to each other...hold them at about a 45 degree angle to your body (thumb end in closer to the head - pinky side outwards). This takes stress off the shoulders and helps keep tension on the pecs.
When doing dumbell presses (either on the ball or the bench), tilt the dumbells down and in...if the dumbells were pitchers or water, it would look like you're pouring them on yourself. This tilt (and make sure and keep that tilt through the whole exercise) keeps tension on the pecs. If you keep them horizontal or tilting outwards, the tension goes to the shoulders.
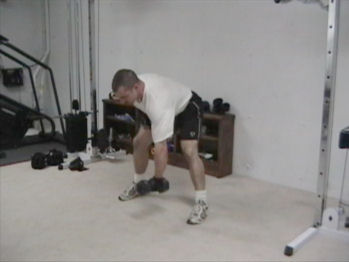
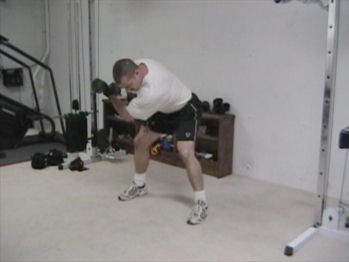
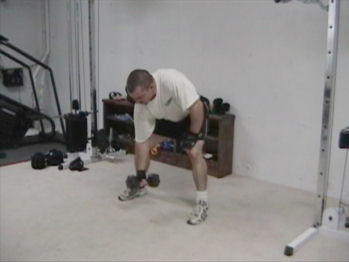
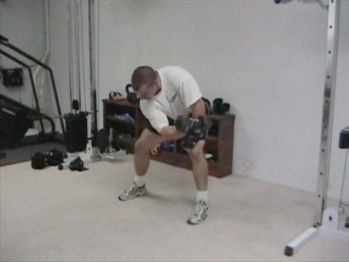
These are done standing, in a bent-over position, with light weight. They're a great exercise for developing that "feel" in the chest. They won't build a chest - just assist in getting that connection. Grab the dumbell and bend over a bit.
Now, keeping your arm slightly bent but stiff (no movement other than at the shoulder), bring the dumbell up and across your body as though trying to touch it to your opposite shoulder.
Because your arm is hanging down and the dumbell is coming across your body, it takes the front delt pretty much completely out of it, forcing the pec to do all the work. Hold at the top and SQUEEZE the pec hard. Remember to go light on this one - it's not about building but developing that mind-muscle connection. And be absolutely sure you're NOT bending your elbow - the movement must occur only at the shoulder.
This is a technique I came up with to force the shoulders down and back (as I mentioned with the flyes above) and get the pecs involved in the bench press. This is done on the flat bench. Roll up a towel and lay it lengthwise down the centerline of the bench. Set it on the bench right between where your shoulder blades will be. Your head should be on a flat section and your butt should be on a flat section.
Lay down on the bench, feeling the towel run right down your spine. This elevation immediately forces your shoulders back and down (the proper position for benching and feeling it in your chest).
It's not particularly comfortable but it's a great teaching tool to force your body into the proper position.
Half the time, you're probably just trying to go too heavy on the chest exercise and you just lose the feel for the exercise. Back off on the weight and feel the pecs working rather than focusing on blasting up the weight. When you load the exercise heavy, your body immediately turns to its strongest movers. If your chest isn't part of that A team, it won't be called upon.
One of the things I've noticed with chest exercises is that the harder you grip the bar/handles, the more the tension gets moved to the shoulders and triceps. Try easing up on your grip a little - not to the extent that you make the exercise dangerous, but back off on the death grip and see if you feel a difference.
This is best done on the very first set of your workout with NO warm-up. You're going to just be using a moderate weight, so don't worry about not doing a huge warm-up. If you have a decent amount of training experience, you'll be just fine. We're going to literally "shock" your chest muscles into responding here. Load the bar with (or select dumbells) a weight you'd normally be able to get about 12 to 15 "strict" reps in your regular workout. Now lay down and CRANK OUT as many reps as you can with that weight as fast as you possibly can. Don't worry if your form isn't perfect...just hammer the reps out. And when I say crank, I mean CRANK...don't bounce the bar off your chest or anything but you must quite simply EXPLODE out of the bottom of every single rep...and don't even think about slowing down to get the negative. The idea here is very rapidly call upon every available muscle fiber worked by that exercise to contribute an emergency situation, especially the power-oriented type 2 muscle fibers. And this emergency idea is why you're not going to do a warm-up...we want it to be a TRUE emergency situation where you go from zero to kablammo! ONE set of this is all you need. Because once you do that first set, not only will the entire area be fatigued, you won't be able to get nearly as many reps and it won't have the same emergency effect on your body.
This can be done on almost ANY chest exercise...though it doesn't work too well on dumbell flyes or presses. It works best on cable crossovers or pec deck, where the tension is greatest at the top, when the arms are close together. It's also pretty good on barbell bench. A straight static hold means just hold that contracted position for as long as you possibly can. Then fight the negative all the way to the bottom. This systematically exhausts all the muscle fibers of the chest AND gives you time to really get your mind into the muscle, shifting your arm and body position during the hold until you really feel it targeting the pecs. By taking this time, you get to feel what you don't normally get during a standard exercise. And those pushes I mentioned? As you're holding that static contraction, have a partner push down on the weight stack (if you're on a pec deck). Just a quick push is all you need. This sets off a stretch reflex in the pecs, activating even more muscle fibers. It's basically another emergency situation. When using cable crossovers, have your partner put their hands in between yours and push outwards really quick. If you're doing a static hold in the top position of the barbell bench, have them push down on the bar really quick while you maintain the hold. A couple of these pushes is all you need.
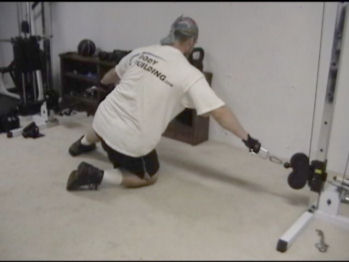
This technique combines two type of resistance - a bodyweight push-up and direct outwards-pulling resistance of cables or bands. When you put them together, it's CRAZY how much tension you'll get on your pecs. (spoiler alert - this is an exercise taken directly from Nick's book!) It's like combining a static hold with a dynamic exercise - two types of tension, both targeted on the pecs. For the cable version, set two handles on the low pulleys and use a light weight. Kneel down holding both handles.
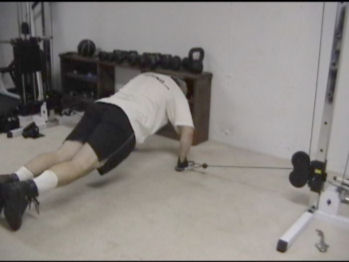
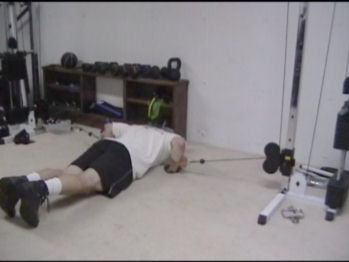
Now set your fists on the floor in the push-up position. Straighten out your body and start doing push-ups.
The cables will be trying to pull your hands directly out to the sides. Your pecs have to fight this outwards-pulling tension. When you add in the push-ups, you'll feel these even more in the chest than you usually would, simply because your pecs are ALREADY working by holding the cables in place. It's a two-for-one exercise that will light up your pecs FAST. You can easily accomplish the same thing with bands by hitching a couple of bands to solid objects out to the sides of you. The just hold the bands in your fists or loop around your wrists, make sure you get tension in them, then do the push-ups.
I have to say, if you've not really felt your pecs before, these techniques should get you seriously moving in the right direction. I would recommend taking a few "chest" days and just trying all these techniques to see which ones work best for you. About the Author: Nick Nilsson, also known as the "Mad Scientist of Exercise," has been training and innovating unique and powerful new exercises and training techniques for more than 10 years. He's published 11 books on weight training, including "The Best Chest Exercises You've Never Heard Of" Visit his site now to learn more about how this book can take your chest development and pressing strength to a whole new level AND grab your FREE sample chest exercises! http://hop.clickbank.net/?XXXXX/betteru&l=850 |


|
How To Do The Perfect Bench Press Rep By Nick Nilsson Note: This article is an excerpt from Nick's new book "The Best Chest Exercises You've Never Heard Of"...53 unique exercises and training techniques for the chest. If you're looking to break through a plateau, get some training variety or just have some fun in your training again definitely check this book out! http://hop.clickbank.net/?XXXXX/betteru&l=850 --- The Flat Barbell Bench Press is one of the most popular exercises in the gym, yet how many people know the most important techniques for maximizing strength and power during each rep? In this article, you will find solid tips without the fluff. These tips will instantly help you to improve your bench press RIGHT NOW! You don't need any special equipment to use these techniques, just a willingness to learn.
Lie down on the bench and unrack the bar as you normally would. Lower the bar to your chest and have a partner take note of the orientation of your forearms. For optimal power, your forearms should be as close to vertical at the bottom of the rep as possible. Adjust your grip accordingly and take note of where your hands are in relation to the smooth rings on the Olympic bar. The reason for this is simple: if your hands are placed wider, some of your pushing power will be expended pushing outwards rather than upwards. If your hands are placed closer, power is expended pushing inwards. When your forearms are vertical, the vast majority of your power goes to pushing the bar directly up.
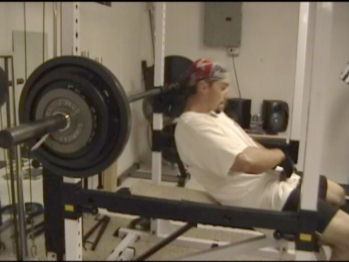
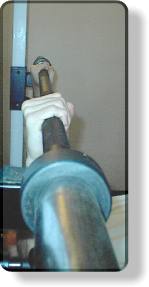
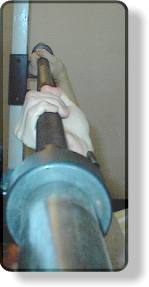
Place your hands on the bar in the grip width that you determined previously. A technique that I like to use to lock my shoulders into the position for maximum strength and stability is as follows: Instead of placing your palms on the bottom of the bar, place them on the back of the bar (this tip also has an accompanying picture). Now, without removing your grip, rotate the bar down so that your palms are now directly under the bar. This has the effect of placing your shoulders into their most stable and strong position. It will almost feel as though you are "locking down" your shoulders. As you are rotating the bar and locking down your shoulders, lift your torso slightly off the bench and force your shoulder blades together tightly underneath your torso. This will force your shoulders back and puff your chest out, placing the pectorals in a position where they have a more effective line of pull. It also has the added bonus of making your torso thicker, reducing the distance you need to press the weight. These pictures illustrate the shoulder-locking tip that is done just before lifting the weight off the racks.
Keep your shoulder blades squeezed tightly behind you for the duration of the set.
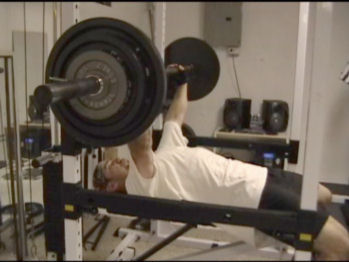
Lightly touch the weight to your chest. DO NOT bounce the weight off your chest! This can cause injury in the form of cracked ribs or even snapping the tip of the sternum (a little bony protrusion known as the Xiphoid Process). It also diffuses the tension you've built up in the pectorals, reducing the effectiveness of the exercise for building strength and muscle mass.
This technique should be practiced with an empty bar before attempting it during a regular set. Start by planting your feet flat on the floor with your knees bent about 80 degrees. This angle is very important as it is what allows you to push with your legs. Lower the empty bar to your chest. The moment you start to push the bar back up, push hard with your legs as though you are trying to slide your body up the bench. With an empty bar you probably will be able to slide yourself up the bench. When you have a loaded bar, however, the weight will keep you from sliding and the pushing power from your legs will get transferred through your body and into pushing the bar up. This is what's known as driving with your legs. It can really beef up your power out of the bottom of the rep.
Keep your feet firmly planted on the floor even if you start to struggle with the weight. The moment you lift your feet off the floor, you break your base of power and the odds of you completing the lift diminish greatly. If you have a tendency to shift your feet around, try placing 2.5 pound plates on your feet. This is not to weigh your feet down but to help you be more aware of what is happening with your feet. If a plate falls, your foot has moved. Strive to keep those plates in place. The bar should follow a slight backwards arc as you press it up, moving from your lower rib cage to over your face at the end of the rep. Be aware of your sticking point and try to drive the bar through it rather than letting the bar slow down as you come up to it. There are many training methods for working on sticking points that I will delve into in a future article.
--- Using these techniques can add immediate poundage to your bench press. Your chest will thank you for it! About the Author: Nick Nilsson, also known as the "Mad Scientist of Exercise," has been training and innovating unique and powerful new exercises and training techniques for more than 20 years. He's published 11 books on weight training, including "The Best Chest Exercises You've Never Heard Of" Visit his site now to learn more about how this book can take your chest development and pressing strength to a whole new level AND grab your FREE sample chest exercises! http://hop.clickbank.net/?XXXXX/betteru&l=850 |
|
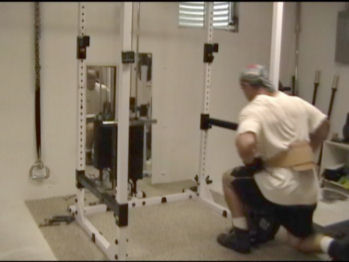
Power Rack Weighted Push-Ups - An Easy Way To Get MORE Out Of the Push-Up By Nick Nilsson Note: This exercise is an excerpt from Nick's new book "The Best Chest Exercises You've Never Heard Of"...53 unique exercises and training techniques for the chest. If you're looking to break through a plateau, get some training variety or just have some fun in your training again definitely check this book out! http://hop.clickbank.net/?XXXXX/betteru&l=850 --- This exercise is a GREAT way to add resistance to the push-up and get the bodyweight-exercise benefits of the push-up. If you can do more than 15 reps of push-ups, they won't build a whole lot of muscle. But when you add significant resistance, they can be even better than heavy bench press for adding mass and strength. Moving your body through space means greater muscle fiber activation and greater functional strength. This setup allows you to easily add as much (or as little) weight as you want to the exercise! (and it beats trying to find a person to sit on your back). First, you'll need a power rack - set one safety rail near the very bottom (this is where your feet will be placed - maybe one or two notches up) and one about 2 to 3 feet or so off the ground (this is where your hands go). If you don't have a rack but have a Smith machine or other adjustable-height bar setup, you can very easily use this exercise as well...just set the Smith bar higher and set your your feet on a bench or other low object. The reason you'll need to get your feet up is that otherwise the plates are probably going to hit the floor at the bottom of the rep. To add weight, you'll need a dip belt - I'm using 90 lbs on the belt in the demo here. Start by getting the weight around your waist.
** Now here's the trick...you won't be leaving the weight on your waist. Instead, squat down and rest the weight plates on the ground - now slide the belt up to your mid-back. This will place it closer to your chest and shoulders and take any potential stress off the lower back during the exercise. Basically, you're putting the weight closer to where your body is supporting it so that you're not putting pressure on the lower back.
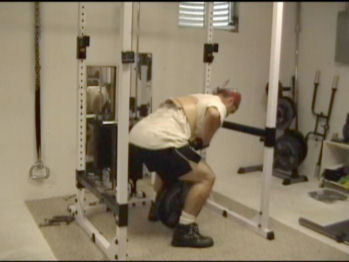
Set your hands on the higher rail - right out to the sides near the uprights (or wherever is comfortable to you for a push-up).
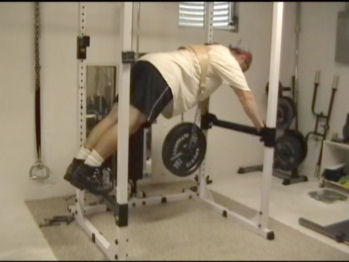
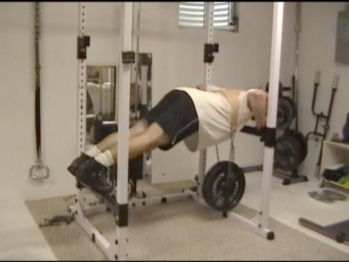
Now step back and put your feet up on the lower safety rail. Your body should be in a pike position (slightly bent at the waist) - this will be the easiest on your lower back. At the top of the exercise, notice how my back is almost horizontal - these two things (along with the belt being higher up on my back) make this easy on the lower back. The pike position really takes the stress of the back and puts it on the chest.
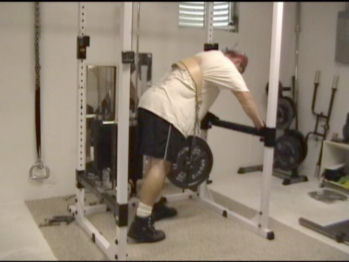
Lower yourself down to the bottom of the push-up position then push back up, just like you were doing a regular push-up on the floor!
Because you're able to add pretty much as much weight as you like or need, this is a VERY useful exercise. If you ever can't complete a rep, all you have to do is step down and you're done. This makes it an ideal way to really work the push-up hard and get the "bodyweight exercise" benefits of the push-up while still getting the "progressive resistance" benefits of a free weight exercise. Now check out the video! [if you'd like to send people through an affiliate link to the video directly on YouTube, use this link, or just use the embed code below to post right on your site] http://hop.clickbank.net/?XXXXX/betteru&l=852
About the Author: Nick Nilsson, also known as the "Mad Scientist of Exercise," has been training and innovating unique and powerful new exercises and training techniques for more than 20 years. He's published 11 books on weight training, including "The Best Chest Exercises You've Never Heard Of" Visit his site now to learn more about how this book can take your chest development and pressing strength to a whole new level AND grab your FREE sample chest exercises! http://hop.clickbank.net/?XXXXX/betteru&l=850 |
|
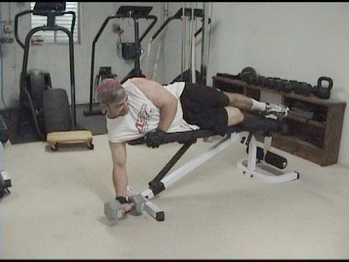
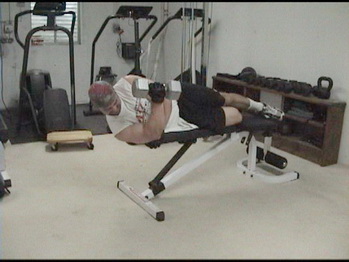
Lying Side Dumbell Flyes For Maximum Chest Contraction and Sharp Chest Cleavage By Nick Nilsson Note: This exercise is an excerpt from Nick's new book "The Best Chest Exercises You've Never Heard Of"...53 unique exercises and training techniques for the chest. If you're looking to break through a plateau, get some training variety or just have some fun in your training again definitely check this book out! http://hop.clickbank.net/?XXXXX/betteru&l=850 --- If you're training with just free weight, it can be tough to find an exercise that really targets the inner pecs to get that pec cleavage thing going. This one is all about hitting that peak contraction position that really targets the inner pec area. THIS exercise gets around the problem of having no cable equipment to hit that inner chest area by using just a dumbell and a bench...it's all about how you position your body. And that's pretty easy, too. You just lie on your side on the bench with your shoulder off the end, holding the dumbell in one hand. You should be far enough up on the bench that your arm is hanging off the end, i.e. the end of the bench is a few inches from your armpit. You'll see this best in the video below.
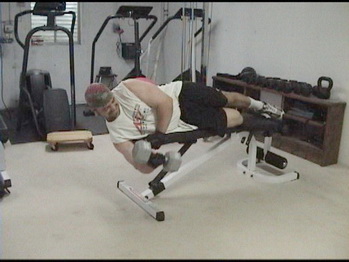
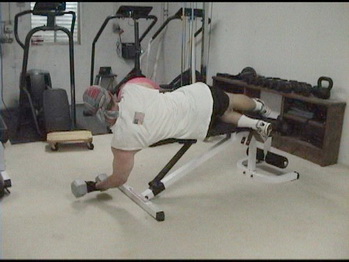
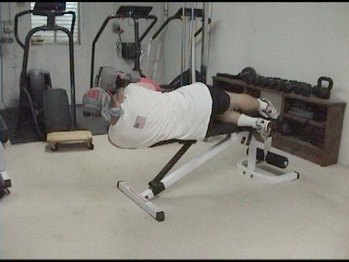
To perform the movement, keeping your elbow slightly bent but LOCKED (this is not a curl!), you bring the dumbell up and around in front of you until it's even with your other shoulder. As you bring the dumbell up and around, try to imagine like you're scooping out a bowl. When you get to the TOP, imagine like your trying to push that dumbell up towards the ceiling.
Hold that top position for a few seconds on each rep and SQUEEZE the crap out of your pec. Because you're lying on your side, you won't get much resistance at the bottom but you will get a HUGE contraction at the top. Be sure to start out lighter than you think you'll need to with this one. I'm using a 25 lb dumbell in the demo here - it's more about feel than weight. The leverage is not great but the effect on the chest IS, when you get that squeeze going. Perform all your reps on one side then switch over to your other side.
This one is great for carving up the chest - it's not a "building" exercise but a "definition" type of exercise (i.e. it's not going to burn fat directly from the chest but it will help improve the overall appearance of the pecs by helping fill out the inner area and increasing muscle density from the squeezing). The other great thing about this one is something I mentioned above...the ability to hit the inner chest without having access to a cable setup or a pec deck machine. All you need is a dumbell and a bench...and honestly, if you're in a hotel room, use your bed as a bench and your luggage for resistance! About the Author: Nick Nilsson, also known as the "Mad Scientist of Exercise," has been training and innovating unique and powerful new exercises and training techniques for more than 20 years. He's published 11 books on weight training, including "The Best Chest Exercises You've Never Heard Of" Visit his site now to learn more about how this book can take your chest development and pressing strength to a whole new level AND grab your FREE sample chest exercises! http://hop.clickbank.net/?XXXXX/betteru&l=850 |
Click here to return to the Best Chest Exercises Ads and Tools page.
|